Introduction: You have coded your app in Kotlin, tested it on your simulator, and polished the designs. Now it is complete! But how do you share it with your friends, family, and millions of Android users worldwide? You must publish it on the Google Play Store. In this guide, we will break down the publishing process into a simple, easy-to-follow checklist.
The Analogy: Setting Up a Market Booth
Imagine you have built a beautiful handmade clock. To sell it inside a massive city market (the Play Store), you must:
- Buy a License (Play Console Account): Pay a one-time registration fee to get your official merchant permit.
- Create a Product Catalog (Listing page): Add attractive posters, describe how the clock works, and declare who it is safe for.
- Submit for Quality Check (Review): Market inspectors inspect the clock to make sure it doesn't break, explode, or steal customer info.
The Step-by-Step Checklist
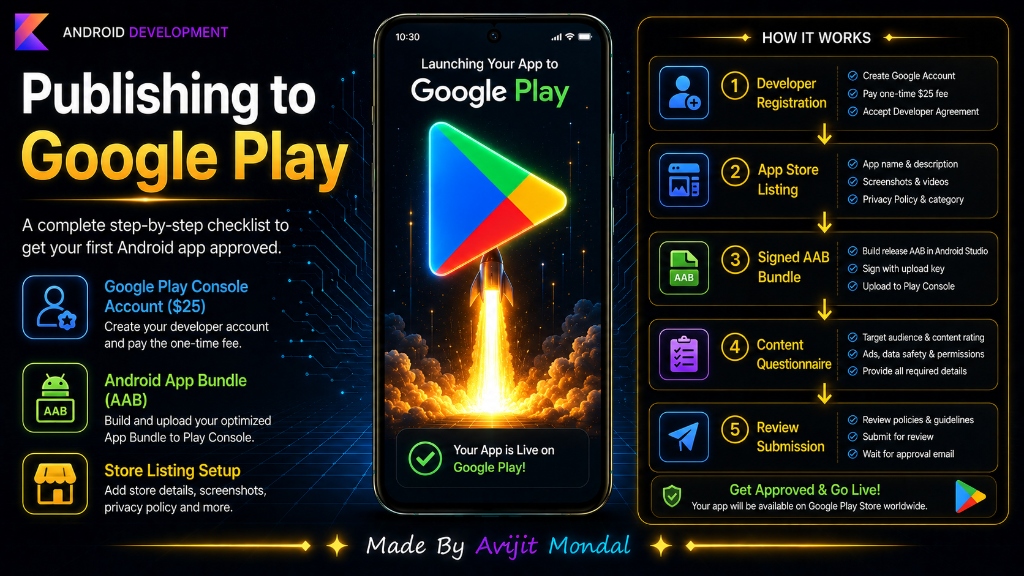
Here are the five main steps to publish your Android app on Google Play:
Step 1: Create a Google Play Console Account
Go to the Google Play Console website. You must register using a Google Account and pay a one-time fee of $25 (unlike Apple, which costs $99 every single year!). You will also need to verify your ID.
Step 2: Create a New App Listing
Inside the console, click 'Create App'. Fill in details like app name, primary language, short description, and full description. Upload your app icon (512x512 pixels), custom banners, and screenshots of your app running on phones and tablets.
Step 3: Generate a Signed App Bundle (AAB)
To upload your app, you must package it securely. In Android Studio, go to Build > Generate Signed Bundle / APK. Choose Android App Bundle (AAB) (Google's modern format that makes app downloads much smaller for users). Create a secure digital key (Keystore) to sign your app, and let Android Studio compile the final file.
Step 4: Answer Questionnaires & Content Ratings
You must answer questions about your app's content. Google asks: Is there violent content? Does it track location? What age group is it for? You must also provide a link to a **Privacy Policy URL** (required for all apps).
Step 5: Upload the Build and Submit for Review
Upload your AAB file to the 'Production' track. Click 'Review and Release' and submit it to Google. Google's automated testers and human reviewers will inspect your app. This review process usually takes between **2 and 7 days** for new developer accounts.
Common Play Store Rejection Reasons
If Google rejects your app, they will email you explaining why. Here is how to prevent common rejections:
| Rejection Reason | Why it happens | How to prevent it |
|---|---|---|
| Impersonation | Your app name or logo looks too similar to a famous app. | Use a unique brand name, icon, and colors. |
| Missing Policy | You forgot to add a privacy policy webpage link. | Use a free blog post or policy builder website to host your text. |
| Broken functionality | The app crashed on startup or login during review. | Provide test user login credentials so reviewers can access the app. |
| Target Audience Errors | Your app has games but is marked 'Not for Children' incorrectly. | Answer the target age group questionnaire carefully. |
.jks keystore file. **Never lose this file or its password!** If you lose it, you will never be able to update your app on the Play Store, and you will be forced to publish a completely new app.Summary
Publishing on Google Play requires creating a Console account (one-time $25 fee), preparing your storefront listing details (screenshots, descriptions), compiling a signed Android App Bundle (AAB) in Android Studio, completing privacy and age questionnaires, and submitting your app for review. Keep your keystore keys secure, test thoroughly, and your app will be live for billions of users!