Introduction: You have spent weeks learning Swift, writing code, and testing your app on your simulator. Now, your app is complete! But how do you get it onto real iPhones around the world? You must publish it on the Apple App Store. In this guide, we will break down the publishing process into a simple step-by-step checklist.
The Analogy: Launching a Product in a Premium Mall
Imagine you have designed a new board game. To sell it inside a premium shopping mall (the App Store), you cannot just walk in and put it on a shelf. You must:
- Get a Seller Account (Developer Membership): Sign an official contract with the mall owner.
- Design the Box (Screenshots & Description): Create attractive posters showing how the game works so customers want to buy it.
- Pass Quality Inspection (App Review): Mall inspectors open the box, check if the game is safe, and verify it does not break when played.
The Step-by-Step Checklist
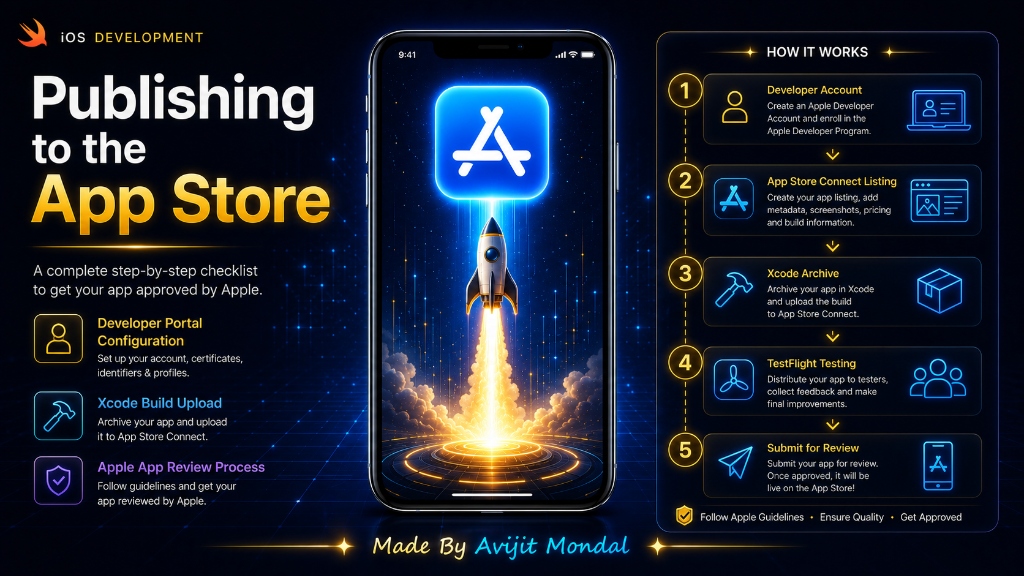
Here are the six steps you need to follow to get your app onto the App Store:
Step 1: Join the Apple Developer Program
To upload apps, you need an Apple Developer Account. It costs $99 per year. You can sign up on the official Apple Developer website using your Apple ID.
Step 2: Create Your App Profile on App Store Connect
App Store Connect is the website where you manage your apps. You will fill in information like: App Name, Subtitle, Description (what the app does), Keywords (to help people find it in search), and a Privacy Policy Link (required for all apps).
Step 3: Prepare Screenshots and Icons
You must upload screenshots showing your app in action. Apple requires screenshots for different screen sizes (specifically for 6.5-inch iPhones and 5.5-inch iPhones). You must also ensure your App Icon is set and looks professional.
Step 4: Upload Your Build from Xcode
This is where you send your code to Apple. Inside Xcode: choose 'Any iOS Device' as the target, go to Product > Archive. Once the archive is ready, click **Distribute App** and follow the prompts. Xcode will upload your compiled app to App Store Connect in the background!
Step 5: Test with TestFlight (Highly Recommended)
Before submitting to Apple, use **TestFlight** to invite friends or colleagues to test your app. They can download it via email and test it on their real devices to make sure there are no hidden bugs.
Step 6: Submit for Review
Once your build is uploaded and tested, click 'Submit for Review' on App Store Connect. A real Apple inspector will download your app and test it. This process usually takes between 24 and 48 hours.
Common Reasons for Rejection
Apple has strict quality guidelines. Here is why apps get rejected and how to avoid it:
| Rejection Reason | Why it happens | How to prevent it |
|---|---|---|
| App Crashes | The app crashed during the inspector's test. | Test on real devices using TestFlight first. |
| Incomplete Info | Missing test login details for a user account. | Provide a demo username/password in the review notes. |
| Broken Links | The privacy policy link does not load. | Use a simple free webpage host for your policy text. |
| Low Value | The app is too simple (e.g. just one button). | Add features, text, or layouts to make it a useful tool. |
Summary
Publishing your app involves registering for an Apple Developer account, preparing your screenshots and app details on App Store Connect, archiving and uploading your build from Xcode, and submitting it to Apple's review team. Test your app thoroughly using TestFlight, and be ready to make quick fixes if Apple requests changes. Soon, your app will be live for millions of users to download!